Monday, 21 October 2013

Access denied when deploying a timer Job or activating a feature from SharePoint 2010 content web application


Collapse imageSYMPTOMS


You get Access Denied when you try to activate a feature in code from SharePoint 2010 web application. This error occurs whenever you try to make changes from the content applications (web front ends) to the config application (central admin application). For example web.config changes. The access denied error happens even when you wrap the code in RunWithElevatedPrivileges.

Collapse imageCAUSE


This is due to a new security feature implemented in SharePoint 2010. This feature explicitly blocks any modifications to the objects inheriting from SPPersistedObject in the Microsoft.SharePoint.Administration namespace and does not allow the content web applications to update the configuration database. This new security feature which controls the behavior is the SPWebService.RemoteAdministratorAccessDenied property in the SharePoint API. Though it can be turned off if needed but as with any security feature, you need to be really careful and perform thorough testing before you turn it off.

Collapse imageRESOLUTION


RemoteAdministratorAccessDenied is a persisted property which can be set to false to disable the feature. You can do this either in a Console app or use Powershell and then perform an IISReset.

//Console app code

SPWebService myService = SPWebService.ContentService;
myService.RemoteAdministratorAccessDenied = false;
myService.Update();


//PowerShell code

function Set-RemoteAdministratorAccessDenied-False()
{
[System.Reflection.Assembly]::LoadWithPartialName("Microsoft.SharePoint") > $null
[System.Reflection.Assembly]::LoadWithPartialName("Microsoft.SharePoint.Administration") > $null

# get content web service
$contentService = [Microsoft.SharePoint.Administration.SPWebService]::ContentService
# turn off remote administration security
$contentService.RemoteAdministratorAccessDenied = $false
$contentService.Update()
}

Set-RemoteAdministratorAccessDenied-False
 

Wednesday, 18 September 2013

Retention Policy for document library in SharePoint 2010

Retention Policy for document library in SharePoint 2010

SharePoint is emerging as an enterprise level content management system. Usually enterprises load all the records to the ECM system. Most of the records are not relevant after a few years. These documents need to be removed from the ECM System. Over the years SharePoint is emerging as an Enterprise ECM and it allows its users to easily setting up document retention policies. Retention policy specifies how a document is disposed.
One of the major improvements in SharePoint 2010 compared to prior version is the improvements in information management policies. SharePoint 2010 can apply the expiration policy in multiple stages, where each stage can do some specific actions such as deleting draft versions, deleting previous versions , deleting the record etc. In SharePoint 2010 you can apply the retention policy to a content type, to a list or document library, to a folder.
For the purpose of this Article, I am going to demonstrate how you can create your own retention policies. I have a document Library named “MyDocuments”, where I want the following policies to be applied.
1. If a document is not modified for 2 year delete its previous versions
2. Any document created here to be deleted after 3 years.
Here are the steps.
Navigate to the “MyDocuments” document library where you are going do the retention policy
clip_image002
From the top ribbon, navigate to the Library tab, and then click on Library settings. (both are marked with red in the below screenshot)
clip_image004
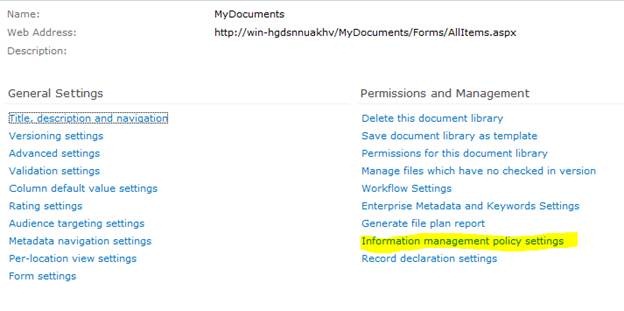
You will be navigated to the document library settings page. Click on the Information management policy settings from this page.
clip_image006
By default a library will inherit its policies from the content type, so that the policies set for the content type will be applied. You can change this by overriding “Source of retention for this library” property. For the purpose of demonstration I am going to set up retention policy for “MyDocuments” library explicitly. Click on the “change source” link.
clip_image008
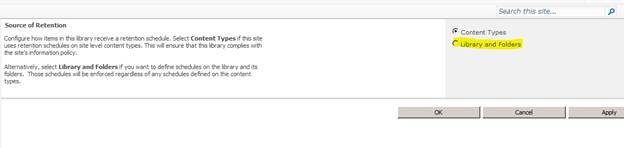
You will reach the configuration page for the retention schedule. Select the libraries and folders radio button. You will receive a warning alert stating the content type retention policy will be ignored. Click ok here.
clip_image010
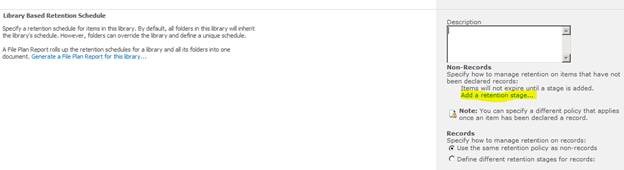
You can see the configuration options available for document library/list here. Click on “add a retention stage" link
clip_image012
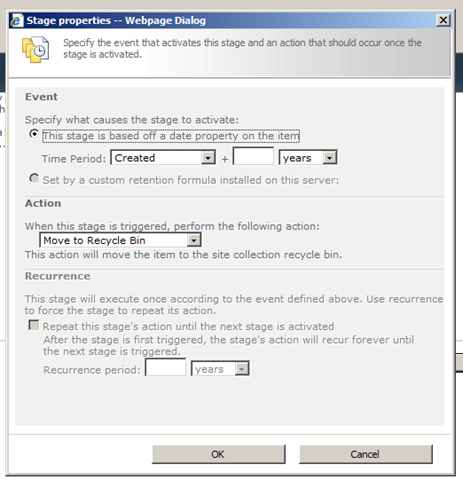
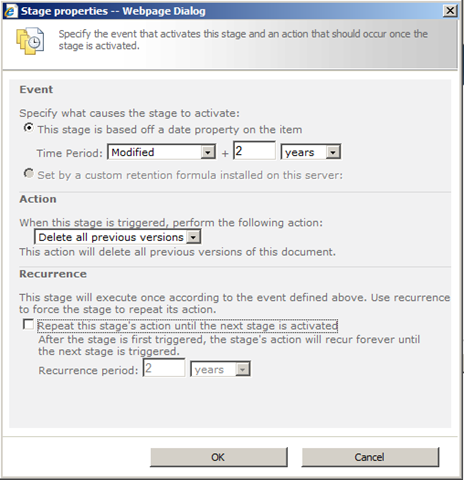
The stage properties dialog will appear. Here I am going to add a stage that checks the document modified date and if it is more than 2 years, delete the previous versions.
clip_image013
In the property window, see the first section – Event. This decides the trigger condition for the stage to do some process. By default, you will have the stage based on the date property. As I specified previously, I need to select the time period as “date modified” and in the textbox enter the value 2. In the action section, from the dropdown select “delete all previous versions”. I don’t want to repeat this stage as I will have another stage that deletes the item. So leave the checkbox unchecked. Click ok to close the property window.
clip_image014
The stage will be configured accordingly. Again click on the “Add a retention stage” link. This time I will add rule, if created date is greater than 3 years, delete the item. The configuration screen is as follows.
clip_image015
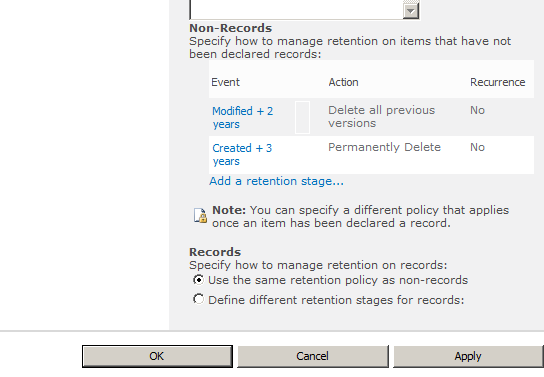
Since you are deleting the item, the recurrence option will be disabled. Click ok to create the stage. Your configured stages will be as follows.
clip_image016
For the records option, leave the default selection as it is. Click on the apply button, then click ok to return to the library settings page.
clip_image017
That’s it. Now the documents placed in “MyDocuments” library will be expired according to the above policy. The steps will be similar, if you want to apply the retention/expiration policy for content type, you need to navigate to the information policy management page of content type and then perform the above steps.


http://weblogs.asp.net/sreejukg/archive/2010/11/11/retention-policy-for-document-library-in-sharepoint-2010.aspx

http://www.c-sharpcorner.com/uploadfile/anavijai/retention-policy-for-a-document-library-in-sharepoint-2010/

Retension Policy in Sharepoint 2010

Retension Policy in Sharepoint 2010.


In Microsoft Office SharePoint Server 2007 we released Information Management Policy. This allowed auditing and expiration on a per content type basis. With SharePoint Server 2010 retention flexibility has been greatly increased. There are now several retention actions that can be performed out of box and it is easy to trigger custom workflows. The biggest new feature is the ability to do location based retention (set retention by folder), which opens new options for hierarchical file plans. You can also do multi stage retention as well.
Configuring Policy
The Information Management Policy settings page can be accessed by going to the site content types gallery, selecting a content type, and clicking on the Information management policy settings link. On the settings page you can fill in an administrative description, this is what is displayed to administrators when configuring policies. A policy statement can also be displayed, this is what will be shown to end users for example when they open a Word document they will get an information bar. There are for categories of policy: retention, auditing, barcodes, and labels. Retention allows you to specify actions that occur after a certain date. Auditing gives you options to select of operations to items that will be tracked. Barcodes and labels can be used to track documents.
clip_image002
Retention Actions
The retention actions include:
· Move to recycle bin
· Permanently delete
· Transfer to another location – You can select from configured Send To locations that will send the document to a content organizer
· Start a workflow – select from available workflows that are associated with the content type (or list in the case of location based policy)
· Skip to next stage
· Declare record – this will mark the item a record using the new in place records feature. At the site collection level you can specify whether a record should be treated as a normal item, block delete, or block edit and delete. In order to use this action the In Place Records site collection feature must be activated.
· Delete previous drafts
· Delete all versions
clip_image003
In the events section you will notice that you can select columns, and there is a disabled option to set a custom retention formula. This option is available if a custom retention formula has been installed on the server. You can check out the article Creating a Custom Expiration Formula Based on Metadata in SharePoint Server for more information about creation a custom retention formula.
Content Type Based and Location Based Retention
With SharePoint Server 2010 you can configure content type or location based retention. Content type based retention lets you specify that all items of a particular content type will follow a retention schedule. To specify a retention stage go to the information management policy settings page, which can be accessed from the main settings page for a content type. From there you can click on the enable button for retention and add new stages. It is important to note that pages, blogs, and wikis are content types that can have policy as well as documents.
Retention can also be specified by library and folder. To do this navigate to the list you would like to configure retention for, go to the list settings page and then click the link for information management policy settings. By default items will follow content type based retention. To change the retention schedule source click the change source link. Now all items in this list will follow the retention schedule that is specified for this list, rather than whatever is specified for the content type. To the left of the screen there is a tree control that can be used to navigate the folders in the list. You can use this control to select different folders to specify a retention schedule for that particular folder and all folders beneath it.

clip_image005
Folders inherit location policy from their parent. At the list level I can set a retention schedule for all items to expire 5 years after created date. All items in the list will receive then expire after 5 years. For the Confidential folder I need to retain items for 7 years, so now any items inside the confidential folder (including any new folders) will now expire at 7 years.
You can also set multi stage retention schedules. Let’s say that after a document has not been modified for more than 90 days previous versions will not be needed, so to save space I want all previous drafts to be deleted (because each version takes is the full size of the document, 10 versions means 10 times the space may be taken up). Also I do not want documents cluttering up this library because it is a collaborative space. After 1 year documents are no longer needed, but they do need to be retained for 7 years due to legal compliance reasons. I can set a second stage to send all documents to a record center after 1 year.

clip_image007
SharePoint Server 2010 provides greatly improved capabilities and flexibility for retention of documents. A few of the major improvements include multi stage retention actions, more out of box retention actions, and location based retention. Also improvements with creating workflows with SharePoint Designer make it much easier to create custom workflows to create retention actions to solve your needs.


http://blogs.msdn.com/b/ecm/archive/2011/10/12/policy-and-retention-in-sharepoint-server-2010.aspx

Thursday, 9 May 2013

How to Create Form Authendication in Sharepoint 2010

Refrenece from :http://blog.morg.nl/2011/08/step-by-step-forms-based-authentication-fba-on-sharepoint-2010/


Step-by-step Forms-Based Authentication (FBA) on SharePoint 2010

This is an A-Z guide that helps you setup a web application with Forms-Based Authentication (FBA) in SharePoint Foundation 2010, using Claims-Based authentication. It uses MS SQL Server to store users. The SharePoint server is running in Windows Server 2008 R2. Although this guide uses SharePoint Foundation 2010, the same steps apply to SharePoint Server 2010.
In this guide, you’ll create a SQL Server database to hold users and roles, create a SharePoint Web Application that uses FBA, configure IIS and the web.config files for the Web App, Central Admin and the Security Token Service, create a test user in the database and test your setup.


Setting up the ASP.NET Membership Provider database

Before we make any changes to SharePoint, let’s first create the database to store our users and groups.
Log on to your SharePoint server with a SharePoint admin account. Make sure this account has the DB creator server role on the SQL server that’ll hold the FBA users DB.
Navigate to the .NET v2 folder. The default location is: C:\Windows\Microsoft.NET\Framework\v2.0.50727
Here, locate the file aspnet_regsql.exe and run it.
You’ll be presented with the ASP.NET SQL Server Setup Wizard.

Click Next to continue to the Select a Setup Option step.

Select Configure SQL Server for application services. This is the default option.
Click Next to advance to the Select the Server and Database step.

Specify the SQL Server name and instance where you want to create the database. Also specify the database name.
Click Next to advance to the Confirm Your Settings step.

Check if you’ve specified the correct SQL Server name and instance and DB name. Click Next to create the database.

If all went well, you’ll see the success screen displayed above. Let’s check if the database was created as intended.
Start Microsoft SQL Server Management Studio and connect to the database server instance. If all went well, you’ll find your new database has been created, along with a bunch of tables to hold our users:

If you’re using Integrated Security, you’ll need to provide access to the database for the following service accounts in SharePoint:
  • Service Account that’ll be used for the application pool for the SharePoint Web Application using FBA.
  • Service Account used for the Security Token Service.
  • Service Account used for the Application Pool of SharePoint Central Administration.
In this case, we’ll be using SQL Server authentication. So create a new Login on the SQL Server. From SQL Server Management Studio, use the Object Explorer to navigate to the Security → Logins folder. Right click on the Logins folder to open the context menu and choose the menu item New Login…
This will open the Login – New dialog. Here, you specify a Login name, i.e. FBAService and a SQL Server authentication password, i.e. pwd. You can set your membership provider database as the Default database. Click OK to add the user. It will now show up in the list of logins.
To give the login access to the database, locate the database in the Object Explorer, under the Databases folder and expand the folder Security. Open the context menu from the Users folder and choose the option New User…
This opens the Database User – New dialog.
In this dialog, specify a name for the user and insert the login name that you created earlier (i.e. FBAService) in the Login name text field.
Assign the following Database roles to the user:
  • aspnet_Membership_FullAccess
  • aspnet_Roles_FullAccess
Click the OK button to add the user to the database.

Creating the Web Application

Now that the DB has been created, we’ll create a new Web Application on the SharePoint 2010 server.
Open Central Administration as a SharePoint Farm administrator user.
Under Application Management, select Manage Web Applications.

You’ll see a list of current Web Applications, Click the New button in the Contribute section of the Ribbon to create a new Web Application.
After a few seconds, you’ll see the Create New Web Application Modal window.
First, change the authentication mode to Claims Based Authentication.

Next, Specify the Name, Port and Host Header of your new IIS web site.

Leave the Security Configuration settings as default (no anonymous and no SSL).
Under Claims Authentication Types, leave the default settings for now (Enable Windows Authentication, using Integrated Windows Authentication via NTLM). We’ll modify these settings for FBA later.
Set the remaining settings for the new Web Application as you see fit.
Click OK button to create the new Web Application. Wait a few moments until the Application Created dialog is shown, and click the OK button to close it (don’t create a site collection just yet). The new Web Application will now show up in the list of Web Applications.

Modify IIS settings

In your SharePoint 2010 Foundation server, start Internet Information Services (IIS) Manager.
Under your Web Server, navigate to the IIS site that we created in the previous step and double click on Connection Strings

You’ll see a list of Connection Strings. In the Actions Pane, click Add… This opens the Add Connection String dialog.

Here, specify a name for the connection string and give the SQL Server name and instance, and database name of the DB that we created earlier. Use the Set… button to specify the SQL Server authentication credentials for the SQL Server user that will access the database.
Click the OK button to add the connection string.
Go back to the IIS site screen and double click Providers.

Under Feature:, select .NET Users and in the Actions Pane, click Add…

The Add Provider window opens…

Here, we’ll modify a few settings:
  • First of all, select SqlMembershipProvider from the Type dropdown listbox.
  • Next, specify a name for the Provider, i.e. “FBA”.
  • Under the Behaviour section, specify the desired behaviour for the SqlMembershipProvider.
  • Under Data, select the Connectionstring we created in an earlier step.
  • For the ApplicationName, enter “/”.
Click the OK button to add the provider. The new .NET Users provider will be visible in the list of Providers.
Now, Change the feature to .NET Roles and in the Action pane, click Add…

The Add Provider window opens…

Here, set the following items:
  • Under Type, select SqlRoleProvider
  • Specify a name for the SqlRoleProvider, i.e. “FBARoles”
  • Under Data, select the Connectionstring we created in an earlier step.
  • For the ApplicationName, enter “/”.
Click the OK button to add the provider. The new .NET Roles provider will be visible in the list of Providers.
The changes we’ve made to the IIS settings so far, have actually been made in the ASP.NET Web.Config file.
In the IIS Manager, Switch to Content View, Open the Context menu by clicking below the list of files and folders and choose Explore to open Windows Explorer.
From the new Windows Explorer window, open the web.config file in Notepad to view the changes.
The highlighted rows were added with our previous actions:
1
2
3
4
5
6
7
8
9
10
11
12
13
14
15
16
17
18
19
20
21
22
23
24
<configuration>
    [...]
    <system.web>
        [...]
        <membership defaultProvider="i">
            <providers>
                <add name="i" type="Microsoft.SharePoint.Administration.Claims.SPClaimsAuthMembershipProvider, Microsoft.SharePoint, Version=14.0.0.0, Culture=neutral, PublicKeyToken=71e9bce111e9429c" />
                <add name="FBA" type="System.Web.Security.SqlMembershipProvider, System.Web, Version=2.0.0.0, Culture=neutral, PublicKeyToken=b03f5f7f11d50a3a" connectionStringName="ontw-spf2010 FBA DB" enablePasswordReset="true" enablePasswordRetrieval="false" passwordFormat="Hashed" requiresQuestionAndAnswer="false" requiresUniqueEmail="true" applicationName="/" />
            </providers>
        </membership>
        <roleManager defaultProvider="c" enabled="true" cacheRolesInCookie="false">
            <providers>
                <add name="c" type="Microsoft.SharePoint.Administration.Claims.SPClaimsAuthRoleProvider, Microsoft.SharePoint, Version=14.0.0.0, Culture=neutral, PublicKeyToken=71e9bce111e9429c" />
                <add name="FBARoles" type="System.Web.Security.SqlRoleProvider, System.Web, Version=2.0.0.0, Culture=neutral, PublicKeyToken=b03f5f7f11d50a3a" connectionStringName="ontw-spf2010 FBA DB" applicationName="/" />
            </providers>
        </roleManager>
        [...]
    </system.web>
    [...]
    <connectionStrings>
        <add connectionString="Server=ontw-sql2010\test;Database=FBA-ontw-spf2010;User ID=FBAService;Password=pwd" name="ontw-spf2010 FBA DB" />
    </connectionStrings>
    [...]
</configuration>
As you can see, there are also other providers there, named ”i” and “c”. These are there by default and required for Claims Based Authentication. Be sure not to modify them!
The membershipprovider also supports additional settings, such as the minimum required password length and number of non-alphanumeric characters required in a password. For a full list of properties that can be set, see http://msdn.microsoft.com/en-us/library/9x1zytyd(v=VS.90).aspx

Add ConnectionString and Providers to STS and Central Admin.

In order for FBA to work, the ConnectionString, .NET Roles provider and .NET Users provider also need to be added to the web.config files of the Security Token Service and the web.config file of the Central Administration Web Application.
We could do this using the dialogs we used from the previous steps, but we can also make the changes in the web.config files directly.
First up: the Security Token Service.
From the IIS Manager, locate the web.config file location by following these steps:

Under the SharePoint Web Services IIS site, Select SecurityTokenServiceApplication, open the context menu by right-clicking the SecurityTokenServiceApplication node and choose Explore.
This will open a Windows Explorer dialog with the location of the STS web.config file. The default location is C:\Program Files\Common Files\Microsoft Shared\Web Server Extensions\14\WebServices\SecurityToken.
Open the web.config in a text editor, like Notepad and make the following changes:
In the <configuration> section, see if there is a <connectionStrings> element present. If not, add a <connectionStrings> element. Next, add the element containing the connection string to the FBA database as highlighted in the Web App’s web.config file above, i.e.:
1
2
3
  <connectionStrings>
    <add connectionString="Server=ontw-sql2010\test;Database=FBA-ontw-spf2010;User ID=FBAService;Password=pwd" name="ontw-spf2010 FBA DB" />
  </connectionStrings>
Next, check if there is a <system.web> element, with <membership> and <roleManager> elements present in the web.config, and add it if not, add them. Now add the membership and role manager providers, as highlighted in the Web App’s web.config snippet, i.e.
1
2
3
4
5
6
7
8
9
10
11
12
13
14
15
16
17
18
19
20
21
22
23
  <system.web>
    <membership defaultProvider="FBA">
      <providers>
        <add name="FBA"
              type="System.Web.Security.SqlMembershipProvider, System.Web, Version=2.0.0.0, Culture=neutral, PublicKeyToken=b03f5f7f11d50a3a"
              connectionStringName="ontw-spf2010 FBA DB"
              enablePasswordReset="true"
              enablePasswordRetrieval="false"
              passwordFormat="Hashed"
              requiresQuestionAndAnswer="false"
              requiresUniqueEmail="true"
              applicationName="/" />
      </providers>
    </membership>
    <roleManager enabled="true" defaultProvider="FBARoles">
      <providers>
        <add name="FBARoles"
              type="System.Web.Security.SqlRoleProvider, System.Web, Version=2.0.0.0, Culture=neutral, PublicKeyToken=b03f5f7f11d50a3a"
              connectionStringName="ontw-spf2010 FBA DB"
              applicationName="/" />
      </providers>
    </roleManager>
  </system.web>
Save your changes to the web.config file.
Return to IIS Manager and locate the web.config file for Central Administration:
Select the SharePoint Central Administration v4 IIS site from the list of sites, open the context menu for this site and choose Explore.
From the Windows Explorer window, open the web.config file in a text editor like Notepad.
Here, also add the ConnectionString snippet to the <configuration> section and add the .NET Users and .NET Roles providers, just like you did for the STS site.
Note: the Central Admin’s web.config should already contain the <roleManager> and <membership> elements in <system.web>. Be sure not to modify any existing providers.
Important: the default provider for the roleManager must be set to “AspNetWindowsTokenRoleProvider”. (also see the highlighted row below)
1
2
3
4
5
6
7
8
9
10
11
12
13
14
15
16
17
18
19
20
21
<membership defaultProvider="FBA">
  <providers>
    <add name="FBA"
          type="System.Web.Security.SqlMembershipProvider, System.Web, Version=2.0.0.0, Culture=neutral, PublicKeyToken=b03f5f7f11d50a3a"
          connectionStringName="ontw-spf2010 FBA DB"
          enablePasswordReset="true"
          enablePasswordRetrieval="false"
          passwordFormat="Hashed"
          requiresQuestionAndAnswer="false"
          requiresUniqueEmail="true"
          applicationName="/" />
  </providers>
</membership>
<roleManager enabled="true" defaultProvider="AspNetWindowsTokenRoleProvider">
  <providers>
    <add name="FBARoles"
          type="System.Web.Security.SqlRoleProvider, System.Web, Version=2.0.0.0, Culture=neutral, PublicKeyToken=b03f5f7f11d50a3a"
          connectionStringName="ontw-spf2010 FBA DB"
          applicationName="/" />
  </providers>
</roleManager>
To enable wildcards in the people picker, locate the <PeoplePickerWildCards> element (inside the <SharePoint> element), and add a key with the name of your Membership provider and value “%”. It will look like this (the highlighted line is the key we added):
1
2
3
4
5
<PeoplePickerWildcards>
  <clear />
  <add key="AspNetSqlMembershipProvider" value="%" />
  <add key="FBA" value="%" />
</PeoplePickerWildcards>

Creating a test user

It’s hard to test FBA if you don’t have any users, so we’ll add a test user first. One way of doing this is via the IIS manager.
First, we add a role to assign to the users. In IIS Manager, select the Web Application that will use FBA and from the Features View, double click on .NET Roles.

You’ll receive an error message, saying the the feature cannot be used, because the default provider is not a trusted provider. The default provider is “c”, which is the SPClaimsAuthRoleProvider. Click on the OK button to close the dialog.
We’ll temporarily set the default provider to our FBARoles provider. Click Set Default Provider… from in the actions pane and select the RoleProvider you created earlier (i.e. FBARoles). Click the OK button.
Click the Add… link in the Actions pane. In the Add .NET Role dialog, enter a name for a role, i.e. FBAUsers. Click the OK button to add the role. The new role is now visible, with 0 users.
We’ll leave the default roles provider this way for now, otherwise we’d not be able to add a .NET user via IIS Manager.
Now, let’s add a user. Go back in IIS Manager to the Features View for your Web Application and double click on .NET Users.

You’ll receive a similar error message, because the default provider (“i”) is not trusted. Click the OK button to ignore.
Now click the Set Default Provider… link in the Actions pane and change the default provider to the Membership Provider you created earlier (i.e. FBA).
Click the Add… link in the actions Pane, to add a new user.
The Add .NET User wizard appears. Enter the credentials for your test user (i.e. a User Name FBAtest). Click Next to advance to the next step.
Now assign a role to the new user by clicking the checkbox(es) for the role(s). Click Finish to add the user.
Important: Return the Default Provider for the .NET users to “i”  and for the .NET Roles to “c”.

Test in Central Administration

Now that we have the membership and roles provider set up in the Web Application, Central Admin and STS, we can test if it works.
In Central Administration, go to Application ManagementManage web applications.
Select the Web Application you created earlier by clicking on it in the list. Its row will highlight Now click the Authentication Providers button.
 The Authentication Providers modal dialog will open. Click on the Default zone.
Scroll down to the Claims Authentication Types section. Here, deselect Enable Windows Authentication and select Enable Forms Based Authentication (FBA).

Fill the ASP.NET Membership provider and ASP.NET Role manager names text boxes, with the names you defined earlier (i.e. FBA and FBARoles).
Note: you can also use both Windows Authentication and FBA simultaneously, should you want to.
Leave the other settings and scroll down to click the Save button.
After a few seconds, you’ll see the Authentication Providers modal dialog again. Close the dialog. You’ll return to the Web Applications list.
With the FBA Web Application still selected, click the User Policy button in the ribbon.

The Policy for Web Application modal dialog opens. Click on the Add Users link.
The Add Users wizard opens, click Next >.
In the next page, the cursor will show up in the people picker field. Click the Browse button to open the Select People and Groups dialog.

In the select People and Groups dialog, type (a part of) the name of the FBA test user you added from IIS Manager in the Find text box and press the search button. You should find the user in the Forms Auth search results.

This verifies that the FBA membership provider works from Central Admin. As we don’t want to add this user, press the Cancel button and Close the Add Users dialog.

Create Site Collection and test

So far, we only created and configured the Web Application. To test FBA in the SharePoint site, we need to create a site collection.
In Central Administration, go to Application ManagementCreate site collections.
Make sure you select the right Web Application, and specify a Title and Template for the top-level site.
Select a Primary Site Collection Administrator, i.e. the FBA user you created earlier.

Click the OK button to create the site collection.
Now navigate to the newly created Site Collection. You’ll see a login page for the FBA credentials.
Note: if you chose to use multiple authentication methods for the Web Application’s Authentication Providers, you’ll be asked to select an authentication method from a dropdown listbox first.
Sign in the the FBA user you declared as the Site Collection Administrator.

If all went well, you’ll see the name of the FBA user in the upper right corner!


Tuesday, 24 January 2012

Item level security on SharePoint List Programatically


Item level security on SharePoint List Programatically

Properties to set item level security is already in SharePoint object Model. Following is the
SPList have properties to set item level security: SPList.ReadSecurity and SPList.WriteSecurity

E.g.
SPList spList = SPContext.Current.Web.Lists["Vaibhav Blog List"];
spList.ReadSecurity = 2;
spList.WriteSecurity = 4;
spList.Update();

In more, below will help you to understand more:

ReadSecurity
1. SPList.ReadSecurity = 1 stands for Read Access: Specify which items users can read “All items”
2. SPList.ReadSecurity = 2 stands for Read Access: Specify which items users can read “Only their own”
WriteSecurity 
1. SPList.WriteSecurity = 1 stands for Edit access: Specify which items users can edit “All items”
2. SPList.WriteSecurity = 2 stands for Edit access: Specify which items users can edit “Only their own”
3. SPList.WriteSecurity = 4 stands for Edit access: Specify which items users can edit “None”

Sunday, 22 January 2012

BBIINNCC reference

Deploying page layouts URL:
 <Module Name="masterpage" Url="_catalogs/masterPage">
<File Path="masterpage\BincArticleLeft.aspx" Url="BincArticleLeft.aspx"  Type="GhostableInLibrary">
     
      <Property Name="Title"
            Value="abc" />
      <Property Name="MasterPageDescription"
                Value="The article page with image on left contains an image field and a rich text field." />
      <Property Name="ContentType"
                Value="$Resources:cmscore,contenttype_pagelayout_name" />
      <Property Name="PublishingPreviewImage" Value="/_catalogs/masterpage/en-US/Preview Images/ArticleLeft.png"/>
      <Property Name="PublishingAssociatedContentType"
      Value=";#ArticleBInc;#0x010100C568DB52D9D0A14D9B2FDCC96666E9F2007948130EC3DB064584E219954237AF39002b979b5c686349eb92d939ff73924bec009f244e5227374f12aee85340cb147169;#"/>
    </File>
</Module>

Deploying page Pages:
<Module Name="Pages" Path="Pages" Url="$Resources:cmscore,List_Pages_UrlName;">

<File Name="Accueil.aspx" Url="Home.aspx"  Path="\Home.aspx" Type="GhostableInLibrary" IgnoreIfAlreadyExists="TRUE">
      <Property Name="Title" Value="Accueil"/>
      <Property Name="PublishingPageLayout" Value="~SiteCollection/_catalogs/masterpage/ArticleLinks.aspx, Title"/>
      <Property Name="ContentType" Value="Page Article Binc" />
      <Property Name="ContentTypeId"
                Value="0x010100C568DB52D9D0A14D9B2FDCC96666E9F2007948130EC3DB064584E219954237AF39002b979b5c686349eb92d939ff73924bec009f244e5227374f12aee85340cb147169" />
      <Property Name="PublishingPageContent"
        Value="page content comes here" />
    </File>
</Module>

List Instance:
 <List FeatureId="4bcccd62-dcaf-46dc-a7d4-e38277ef33f4" Type="851"
                    Title="Images et Photos" Url="$Resources:core,lists_Folder;/ImagesPhotos"
                      Description="Liste des images et photos publique du département" QuickLaunchUrl="$Resources:core,lists_Folder;/ImagesPhotos" />
 <List FeatureId="00BFEA71-EC85-4903-972D-EBE475780106" Title="Événements"
              Type="106"  Description="Liste des événements publiques du département"
              Url="$Resources:core,lists_Folder;/$Resources:core,calendar_Folder;"
              QuickLaunchUrl="$Resources:core,lists_Folder;/$Resources:core,calendar_Folder;/Calendar.aspx" />
 <List Title="Annonces Privées" VersioningEnabled="True" EnableMinorVersions="True"
         FeatureId="00bfea71-d1ce-42de-9c63-a44004ce0104"
         Url="AnnoncesPrivees"
         Description="Liste des annonces du département" Type="104">
        </List>

  <List Title="Tâches" VersioningEnabled="True" EnableMinorVersions="True"
       FeatureId="00bfea71-a83e-497e-9ba0-7a5c597d0107"
       Url="Taches"
       Description="Liste des tâches du département" Type="107">
        </List>


Creating Views in onet.xml:
 <Module Name="DefaultBlank" Url="" Path="">
      <File Url="default.aspx">
 <View  BaseViewID="0" List="AnnoncesPrivees" WebPartZoneID="webpartzone1"  DisplayName="Annonce du département" RowLimit="1"  >
          <![CDATA[
              <webParts>
                  <webPart xmlns="http://schemas.microsoft.com/WebPart/v3">
                      <metaData>
                          <type name="Microsoft.SharePoint.WebPartPages.XsltListViewWebPart,Microsoft.SharePoint,Version=14.0.0.0,Culture=neutral,PublicKeyToken=71e9bce111e9429c" />
                          <importErrorMessage>Cannot import this Web Part</importErrorMessage>
                      </metaData>
                      <data>
                          <properties>
                              <property name="Title">Annonce du département</property>
                              <property name="AllowConnect" type="bool">True</property>
                              <property name="AllowClose" type="bool">False</property>
                          </properties>
                      </data>
                  </webPart>
              </webParts>
          ]]>
        </View>
</File>
</Module>

Image webpart:
<AllUsersWebPart WebPartZoneID="webpartzone10" WebPartOrder="4">
          <![CDATA[
      <WebPart xmlns:xsi="http://www.w3.org/2001/XMLSchema-instance" xmlns:xsd="http://www.w3.org/2001/XMLSchema" xmlns="http://schemas.microsoft.com/WebPart/v2">
        <Title>Image Web Part</Title>
        <FrameType>None</FrameType>
        <Description>Use to display pictures and photos.</Description>
        <PartImageSmall />
        <PartImageLarge>/_layouts/images/msimagel.gif</PartImageLarge>
        <Assembly>Microsoft.SharePoint, Version=12.0.0.0, Culture=neutral, PublicKeyToken=71e9bce111e9429c</Assembly>
        <TypeName>Microsoft.SharePoint.WebPartPages.ImageWebPart</TypeName>
        <ImageLink xmlns="http://schemas.microsoft.com/WebPart/v2/Image%22%3E/_layouts/images/homepageSamplePhoto.jpg%3C/ImageLink>
        <AlternativeText xmlns="http://schemas.microsoft.com/WebPart/v2/Image" />
        <VerticalAlignment xmlns="http://schemas.microsoft.com/WebPart/v2/Image%22%3EMiddle%3C/VerticalAlignment>
        <HorizontalAlignment xmlns="http://schemas.microsoft.com/WebPart/v2/Image%22%3ECenter%3C/HorizontalAlignment>
        <BackgroundColor xmlns="http://schemas.microsoft.com/WebPart/v2/Image%22%3Etransparent%3C/BackgroundColor>
      </WebPart>
   ]]>
        </AllUsersWebPart>

Adding Content types to list and setting default content type:
using System.Collections.Generic;

 SPContentType contype = web.ContentTypes["Page Article Binc"];
// to get the content type from root site
//SPContentType contype1 = SPContext.Current.Site.RootWeb.ContentTypes["Page Article Binc"];
 SPList listpages12 = web.Lists["Pages"];
                    listpages12.ContentTypes.Add(contype);
                    listpages12.Update();
                    SPContentTypeCollection currentOrder = listpages12.ContentTypes;
                    List<SPContentType> result = new List<SPContentType>();
                    foreach (SPContentType ct in currentOrder)
                    {
                        if (ct.Name.Contains("Page Article Binc"))
                        {
                            result.Add(ct);
                        }
                    }
                    listpages12.RootFolder.UniqueContentTypeOrder = result;
                    listpages12.RootFolder.Update();
                    listpages12.Update();


Setting default page:
  PublishingWeb publishingWeb = PublishingWeb.GetPublishingWeb(web);
                PublishingPageCollection webpages = publishingWeb.GetPublishingPages();
                                web.AllowUnsafeUpdates = true;

                SPFile welcomeFile = web.GetFile(web.ServerRelativeUrl + "pages/home.aspx");
             
                publishingWeb.DefaultPage = welcomeFile;
                publishingWeb.Update();
   web.AllowUnsafeUpdates = true;

Hiding Page Layouts:
PublishingWeb publishingWeb = PublishingWeb.GetPublishingWeb(web);
 PageLayout[] layouts = publishingWeb.GetAvailablePageLayouts();
 foreach (PageLayout layout in layouts)
                {                  
                   
                    if (layout.Name.Equals("ArticleLeft.aspx"))
                    {
                        SPListItem item1 = layout.ListItem;
                        item1.File.CheckOut();
                        item1["PublishingHidden"] = true;
                        item1.Update();
                        item1.File.CheckIn("CheckIn");
                        item1.File.Approve("s");

                    }
}


Custom Left Navigation:
 private void displayleftnav(SPSite site, string url)
        {
            using (SPSite siteCollection = new SPSite(site.Url))
            {
               
                using (SPWeb web1 = siteCollection.OpenWeb(url))
                {
                    PublishingWeb publishingWebs = PublishingWeb.GetPublishingWeb(web1);
                                     
                    publishingWebs.Navigation.InheritGlobal = true;
                    publishingWebs.Navigation.GlobalIncludePages = false;
                    publishingWebs.Navigation.GlobalIncludeSubSites = false;
                    publishingWebs.Navigation.ShowSiblings = false;
                   // publishingWebs.Navigation.CurrentIncludeSubSites = true;
                   // publishingWebs.Navigation.CurrentIncludePages = false;
                    if (web1.Url.Contains("Prive"))
                    {
                        publishingWebs.Navigation.InheritGlobal = true;
                        publishingWebs.Navigation.GlobalIncludePages = false;
                        publishingWebs.Navigation.GlobalIncludeSubSites = false;
                        publishingWebs.Navigation.ShowSiblings = false;
                        publishingWebs.Navigation.CurrentIncludeSubSites = false;
                        publishingWebs.Navigation.CurrentIncludePages = false;
                        publishingWebs.Update();
                         SPNavigationNodeCollection CurrentNavigationNodes = web1.Navigation.QuickLaunch;
                        SPNavigationNode bib = new SPNavigationNode("documents","#",true);
                          SPNavigationNode FirstFolder1 = CurrentNavigationNodes.AddAsFirst(bib);
                          SPNavigationNode childNav1 = new SPNavigationNode("Documents1", web1.ServerRelativeUrl.ToString() + "/Documents1", true);
                          FirstFolder1.Children.AddAsFirst(childNav1);
                          childNav1 = new SPNavigationNode("Documents2", web1.ServerRelativeUrl.ToString() + "/Documents2", true);
                          FirstFolder1.Children.AddAsLast(childNav1);
                          childNav1 = new SPNavigationNode("Documents3", web1.ServerRelativeUrl.ToString() + "/Documents3", true);
                          FirstFolder1.Children.AddAsLast(childNav1);
                          childNav1 = new SPNavigationNode("Vidéos", web1.ServerRelativeUrl.ToString() + "/Lists/Videos", true);
                          FirstFolder1.Children.AddAsLast(childNav1);
                          //Then second folder
                          SPNavigationNode SecondFolder1 = CurrentNavigationNodes.AddAsLast(new SPNavigationNode("Outils", "#", true));
                          SPNavigationNode childNavSecond1 = new SPNavigationNode("Liens utiles", web1.ServerRelativeUrl.ToString() + "/LiensUtiles", true);
                          SecondFolder1.Children.AddAsFirst(childNavSecond1);
                          childNavSecond1 = new SPNavigationNode("Mes liens", web1.ServerRelativeUrl.ToString() + "/MesLiens", true);
                          SecondFolder1.Children.AddAsLast(childNavSecond1);
                          //Third Folder
                          SPNavigationNode ThirdFolder1 = CurrentNavigationNodes.AddAsLast(new SPNavigationNode("Autres", "#", true));
                          //add children
                          SPNavigationNode childNavThird1 = new SPNavigationNode("Annonces", web1.ServerRelativeUrl.ToString() + "/AnnoncesPrivees", true);
                          ThirdFolder1.Children.AddAsFirst(childNavThird1);
                          childNavThird1 = new SPNavigationNode("Articles", web1.ServerRelativeUrl.ToString() + "/Pages", true);
                          ThirdFolder1.Children.AddAsLast(childNavThird1);
                    }
                    // Maximum number of dynamic items to show within this level of navigation:
                    //publishingWeb.Navigation.GlobalDynamicChildLimit = 60;
                    //Update the changes
                    publishingWebs.Update();
                }
            }

        }


Adding Custom Top Navigation
 private void AddGlobalNavigation(SPSite site)
        {
           
            SPWeb web = site.OpenWeb();
            SPNavigationNodeCollection topNavigationNodes = web.Navigation.TopNavigationBar;
            SPNavigationNode objItem = new SPNavigationNode("Siège Social", "/Pages/Fr/SiegeSocial.aspx", true);
            //This should be for first folder
            SPNavigationNode FirstFolder = topNavigationNodes.AddAsFirst(objItem);
            //Then add its children
            SPNavigationNode childNav = new SPNavigationNode("Notre équipe", "/Pages/Fr/NotreEquipe.aspx", true);
            FirstFolder.Children.AddAsFirst(childNav);
            childNav = new SPNavigationNode("Organigrammes", "/Pages/Fr/Organigramme.aspx", true);
            FirstFolder.Children.AddAsLast(childNav);
            childNav = new SPNavigationNode("Plan de continuité des affaires", "/Fin/Pages/Fr/PlanContinuiteAffaires.aspx", true);
            FirstFolder.Children.AddAsLast(childNav);
            childNav = new SPNavigationNode("Mesures d'urgence", "/Fin/Pages/Fr/MesuresUrgence.aspx", true);
            FirstFolder.Children.AddAsLast(childNav);
            childNav = new SPNavigationNode("Plan des étages", "/Fin/Pages/Fr/PlanEtages.aspx", true);
            FirstFolder.Children.AddAsLast(childNav);


            //Then second folder
            SPNavigationNode SecondFolder = topNavigationNodes.AddAsLast(new SPNavigationNode("Actualité", "#", true));
            //add children
            SPNavigationNode childNavSecond = new SPNavigationNode("Revues de presse", "/Pages/Fr/RevueDePresse.aspx", true);
            SecondFolder.Children.AddAsFirst(childNavSecond);
            childNavSecond = new SPNavigationNode("Notes internes", "/Pages/Fr/NotesInternes.aspx", true);
            SecondFolder.Children.AddAsLast(childNavSecond);
            childNavSecond = new SPNavigationNode("Activités et événements", "/Pages/Fr/ActivitesEtEvenements.aspx", true);
            SecondFolder.Children.AddAsLast(childNavSecond);
            childNavSecond = new SPNavigationNode("Avis de nomination", "/Pages/Fr/AvisNomination.aspx", true);
            SecondFolder.Children.AddAsLast(childNavSecond);
            childNavSecond = new SPNavigationNode("Autres nouvelles", "/Pages/Fr/AutresNouvelles.aspx", true);
            SecondFolder.Children.AddAsLast(childNavSecond);
            childNavSecond = new SPNavigationNode("Résultats trimestriels", "/AP/RI/Pages/Fr/ResultatsTrimestriels.aspx", true);
            SecondFolder.Children.AddAsLast(childNavSecond);
            childNavSecond = new SPNavigationNode("Actualité par fonction", "/Pages/Fr/ActualiteFonction.aspx", true);
            SecondFolder.Children.AddAsLast(childNavSecond);
}
}
}